
brother sewing machine jx2517 manual
Welcome to the Brother JX2517 Sewing Machine Manual, your comprehensive guide to unlocking the full potential of your sewing machine. This manual is designed to help you understand the machine’s features, operation, and maintenance, ensuring a seamless sewing experience. Whether you’re a beginner or an experienced sewer, this guide provides detailed instructions to help you get the most out of your Brother JX2517.
- Discover the machine’s features and how to use them effectively.
- Learn proper installation, operation, and maintenance techniques.
- Explore troubleshooting tips and additional resources for support.
This manual is your go-to resource for mastering the Brother JX2517 and achieving professional-grade sewing results.
1.1 Overview of the Brother JX2517 Sewing Machine
The Brother JX2517 is a lightweight, full-size sewing machine designed for versatility and ease of use. It is ideal for sewing various fabrics, from delicate materials to heavy-duty textiles, making it a great choice for both beginners and experienced sewers. The machine features a user-friendly interface, built-in stitches, and optional accessories to enhance functionality. Its compact design and portability allow for convenient storage and transportation. Tested and proven to be in excellent working condition, the Brother JX2517 is a reliable addition to any sewing project. With its robust construction and intuitive controls, this machine is perfect for crafting, quilting, and everyday sewing tasks.
1.2 Importance of Reading the Manual
Reading the Brother JX2517 manual is essential for safe and effective operation. It provides critical information on setup, features, and maintenance, ensuring you maximize the machine’s potential. The manual highlights safety precautions, such as proper threading techniques and power-up procedures, to prevent accidents. By understanding the machine’s capabilities, you can unlock its full functionality, including built-in stitches and optional accessories. Additionally, the manual offers troubleshooting guidance to resolve common issues, saving time and frustration. Following the instructions ensures proper usage, extends the machine’s lifespan, and helps you achieve professional-grade results. It’s a vital resource for both beginners and experienced users.
1.3 Structure and Content of the Manual
The Brother JX2517 manual is organized into eight main sections, each focusing on specific aspects of the sewing machine. The manual begins with an introduction, followed by detailed descriptions of parts and accessories. Subsequent sections cover setup, threading, basic and advanced sewing operations, maintenance, and troubleshooting. It concludes with additional resources and support options. Each section is designed to guide users through every stage of machine operation, from unboxing to complex stitching techniques. The manual includes step-by-step instructions, diagrams, and troubleshooting tips to ensure seamless use. This structured approach makes it easy for users to find the information they need quickly and efficiently.
Parts and Accessories of the Brother JX2517
Explore the essential components and accessories of the Brother JX2517, including the sewing machine head, power cord, foot controller, and presser feet. Discover included and optional extras like bobbins, needles, and specialized sewing feet, all designed to enhance your sewing experience.
- Main machine components for core functionality.
- Accessories for versatility and convenience.
- Optional additions to expand your sewing capabilities.
2.1 Main Components of the Sewing Machine
The Brother JX2517 sewing machine features a lightweight yet durable design, with essential components like the sewing machine head, power cord, and foot controller. The machine includes a variety of presser feet for different sewing tasks, such as zigzag and straight stitching. Other key components include the bobbin case, sewing needles, and the stitch selector dial. These parts are designed to work seamlessly together to ensure smooth and precise stitching. Familiarizing yourself with these components is crucial for optimal performance and easy operation.
- Sewing machine head for core stitching functions.
- Power cord and foot controller for easy operation.
- Presser feet for versatility in stitching options.
2.2 Accessories Included with the Machine
The Brother JX2517 sewing machine comes with a variety of essential accessories to enhance your sewing experience. These include multiple presser feet, such as the zigzag foot, straight stitch foot, zipper foot, and buttonhole foot, designed for specific sewing tasks. Additional accessories include bobbins, sewing needles, and a dust cover to protect the machine when not in use. The machine also comes with a foot controller for easy operation and a power cord for convenient setup. These accessories ensure you have everything you need to start sewing right out of the box.
- Zigzag foot for versatile stitching.
- Straight stitch foot for precise seams.
- Zipper foot for easy zipper installation.
- Buttonhole foot for professional-looking buttonholes.
These included accessories make the Brother JX2517 a complete and ready-to-use sewing machine for various projects.
2.3 Optional Accessories for Enhanced Functionality
To further enhance your sewing experience with the Brother JX2517, consider exploring optional accessories designed to expand its capabilities. These include specialized presser feet for tasks like quilting, embroidery, or heavy-duty sewing, as well as extension tables for larger projects. Additional storage cases can help organize your supplies, while advanced tools like rotary cutters or sewing notions kits offer versatility. These optional accessories allow you to tailor your machine to your specific sewing needs, whether you’re working on home decor, garments, or crafts.
- Specialized presser feet for quilting or embroidery.
- Extension table for managing large fabric projects.
- Storage cases for organization and portability.
- Advanced cutting tools for precision and efficiency.
These optional accessories can elevate your sewing projects, making the Brother JX2517 even more adaptable to your creative goals.

Setting Up the Brother JX2517 Sewing Machine
Unbox and assemble your Brother JX2517 sewing machine carefully. Place it on a stable, flat surface and perform initial power-up checks to ensure proper functionality and safety.
- Unboxing and inspecting all components.
- Assembling the machine according to guidelines.
- Positioning it on a stable work surface.
- Conducting initial power and safety checks.
This setup process ensures your machine is ready for optimal performance and reliable operation.
3.1 Unboxing and Assembling the Machine
Unboxing your Brother JX2517 sewing machine is an exciting first step. Carefully remove the machine and accessories from the box, ensuring all components are included and undamaged. Inspect the machine for any signs of shipping damage and verify that all parts, such as the power cord, foot controller, and accessories, are present. Follow the manual’s assembly instructions to attach any additional parts, like the sewing table or extension arm, if provided. Place the machine on a stable work surface and ensure all components are securely fastened before use.
- Inspect all parts for damage or missing items.
- Assemble the machine according to the manual’s instructions.
- Position it on a flat, stable surface for optimal use.
Proper assembly ensures your machine is ready for safe and efficient operation.
3.2 Placing the Machine on a Stable Work Surface
To ensure optimal performance and safety, place your Brother JX2517 sewing machine on a flat, stable, and durable work surface. Avoid uneven or shaky tables, as this could lead to vibrations and poor stitching quality. Choose a surface with enough space to accommodate the machine and your sewing projects comfortably. Ensure the area is well-lit to enhance visibility. Position the machine near a power outlet to avoid using long extension cords. Keep the surrounding area clutter-free to maintain a safe and organized workspace. A stable setup is essential for smooth operation and precise stitching.
- Opt for a sturdy, flat work surface.
- Ensure good lighting for clear visibility.
- Keep the machine close to a power source.
- Maintain a clutter-free workspace.
Proper placement enhances both safety and sewing accuracy.
3.3 Initial Power-Up and Safety Checks
Before first use, ensure the Brother JX2517 sewing machine is properly powered up and all safety checks are completed. Plug the machine into a grounded power outlet to prevent electrical hazards. Turn the power switch on and check for any unusual noises or movements. Ensure all machine parts are securely attached and there are no loose components. Perform a test stitch on a scrap piece of fabric to verify proper operation. Always keep children away from the machine while it is in use. If any issues arise during startup, consult the manual or contact Brother support for assistance.
- Plug into a grounded outlet for safety.
- Check for unusual noises during startup.
- Ensure all parts are securely attached.
- Test stitch on scrap fabric to confirm functionality.
- Keep children away during operation.
Proper initial power-up and safety checks ensure a safe and efficient sewing experience.

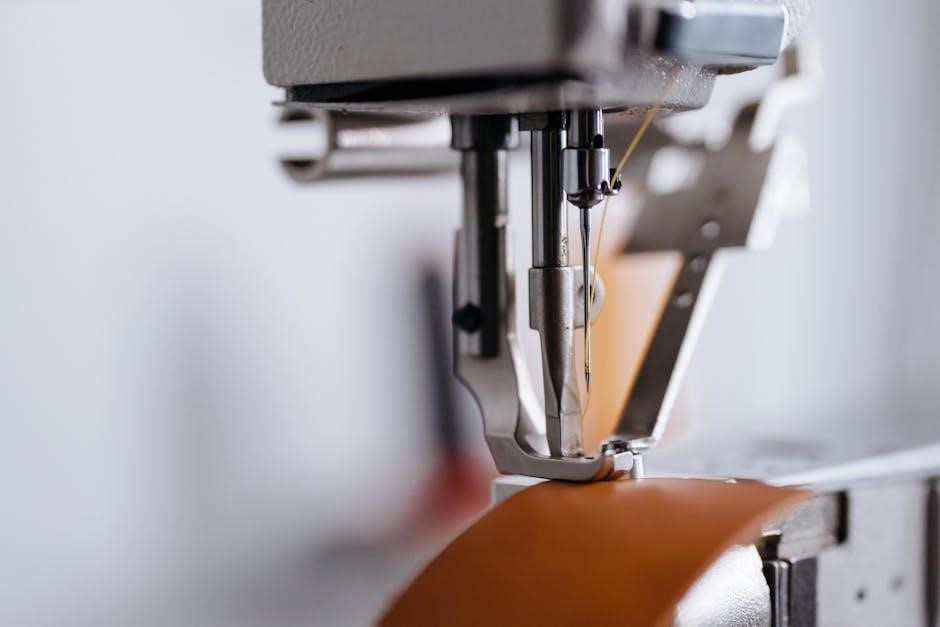
Threading and Bobbin Setup
Master the essential steps for threading your Brother JX2517 and installing the bobbin correctly. Proper setup ensures smooth stitching and prevents machine malfunctions. Follow the step-by-step guide for accurate threading and bobbin installation, avoiding common mistakes. Refer to the included diagrams for visual guidance. This section is crucial for achieving professional-grade stitching results and maintaining your machine’s performance. By following these instructions, you’ll ensure your sewing projects are completed efficiently and effectively. Proper threading and bobbin setup are the foundation of successful sewing with the Brother JX2517.
- Step-by-step threading guide for accuracy.
- Correct bobbin installation techniques.
- Avoid common mistakes for smooth operation.
Threading and bobbin setup are critical for optimal machine performance and stitch quality.
4.1 Step-by-Step Guide to Threading the Machine
To thread your Brother JX2517 sewing machine, start by turning it off and locating the spool pin. Place the thread on the spool pin and gently pull it through the machine’s tension discs. Guide the thread through the take-up lever and then through the needle’s eye. Ensure the thread is seated properly in the tension spring. Finally, pull the thread gently to test its tension. Refer to the included diagrams for visual guidance. Proper threading is essential for smooth stitching and prevents machine issues. Avoid common mistakes like twisting the thread or bypassing the tension spring. This step-by-step guide ensures accurate threading every time.
- Locate the spool pin and place the thread.
- Guide the thread through tension discs and take-up lever.
- Seat the thread in the tension spring and test tension.
Following these steps ensures your machine is threaded correctly for optimal performance.
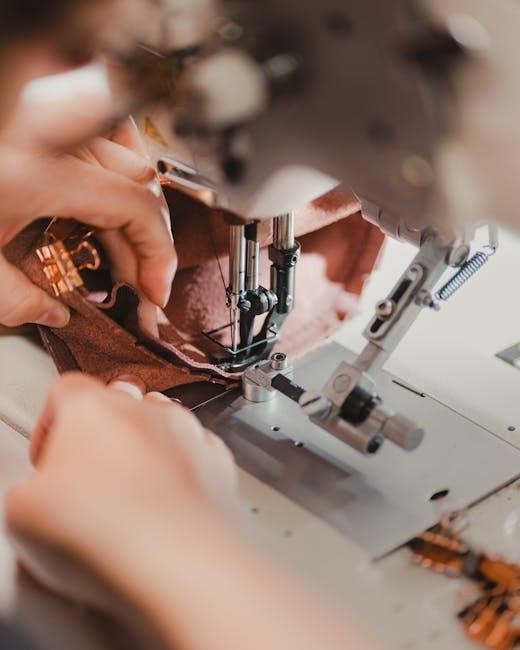
4.2 Proper Bobbin Installation Techniques
Installing the bobbin correctly is crucial for smooth stitching. Start by winding the bobbin with the appropriate thread, ensuring it’s evenly filled but not overfilled. Locate the bobbin case, usually found beneath the needle plate. Open the case by pulling the latch or sliding it open, depending on your machine. Place the bobbin inside, ensuring the thread unwinds clockwise. Close the case securely and pull the thread gently to check its tension. Proper bobbin installation prevents uneven stitches and ensures consistent sewing performance. Always refer to the included diagrams for precise guidance. Correct bobbin placement is essential for optimal machine function.
- Wind the bobbin evenly with the appropriate thread.
- Insert the bobbin into the case, ensuring correct orientation.
- Close the case and pull the thread to check tension.
Following these steps ensures your bobbin is installed correctly for seamless stitching.
4.3 Common Mistakes to Avoid During Threading
When threading your Brother JX2517, avoid common mistakes that can lead to uneven stitches or machine malfunction. Ensure the presser foot is raised to release thread tension. Never pull the thread too tightly, as this can damage the machine. Avoid crossing threads or twisting them, which can cause knots. Always cut the thread at an angle to prevent fraying. Make sure the thread passes through the take-up lever correctly. Neglecting to pull the thread gently after threading can result in improper tension. Follow the manual’s diagrams to ensure the thread path is accurate. Proper threading is essential for smooth operation and consistent stitches.
- Raise the presser foot before threading.
- Avoid pulling the thread too tightly.
- Prevent thread crossing or twisting.
- Use the correct thread path as shown in diagrams.
By avoiding these mistakes, you can ensure proper thread flow and optimal sewing performance.
Basic Sewing Operations
Master the fundamentals of sewing with the Brother JX2517. Learn to select the right fabric, set up your machine, and start your first project confidently.
- Choose the appropriate needle for your fabric type.
- Use the correct presser foot for optimal results.
- Monitor thread tension to prevent fabric puckering.
5.1 Selecting the Right Stitch Type for Your Fabric
Selecting the right stitch type for your fabric is crucial for achieving professional results. The Brother JX2517 offers various stitches suited for different fabrics and projects. For lightweight fabrics like cotton or silk, a straight stitch is ideal. Heavier materials, such as denim, benefit from a reinforced or denim stitch. Zigzag stitches are perfect for stretchy fabrics or preventing fraying. Always consult the machine’s stitch chart or manual for recommendations. Testing the stitch on scrap fabric ensures the best outcome. Proper stitch selection enhances seam quality, prevents damage, and ensures a flawless finish. This step is essential for both beginners and experienced sewers.
- Straight Stitch: Ideal for lightweight fabrics.
- Zigzag Stitch: Perfect for stretchy materials and preventing fraying.
- Reinforced Stitch: Suitable for heavy-duty fabrics like denim.
5.2 Adjusting Stitch Length and Width
Adjusting the stitch length and width on the Brother JX2517 allows you to customize your sewing for different fabrics and projects. The stitch length can be adjusted using the control panel, with options ranging from 0 to 4mm. For delicate fabrics, shorter stitches (2-3mm) are recommended, while longer stitches (up to 4mm) are ideal for heavier materials. The stitch width can also be modified, typically between 0 and 5mm, depending on the selected stitch type. Always refer to the stitch chart in the manual for specific settings. Testing the adjustments on scrap fabric ensures the desired results; Proper stitch length and width ensure even stitching and professional-grade outcomes.
- Shorter stitches for delicate or stretchy fabrics.
- Longer stitches for thicker materials.
- Adjust width based on stitch type and fabric thickness.
5.3 Starting and Stopping Your Sewing Project
Starting your sewing project on the Brother JX2517 begins with ensuring your fabric is properly aligned and the machine is set to the correct stitch type. Gently press the foot pedal to begin sewing, using the handwheel if needed for precise control. Always start with a backstitch to secure the seam. As you sew, maintain steady fabric movement to achieve even stitching. To stop, gradually slow down and complete the seam. Use the automatic thread cutter or scissors to trim excess thread. Turn off the machine and unplug it when not in use. Proper starting and stopping techniques ensure clean, professional results.
- Align fabric and select the appropriate stitch type.
- Use backstitch to secure the beginning of your seam.
- Trim threads neatly after completing your project.
Advanced Features of the Brother JX2517
The Brother JX2517 offers advanced features like built-in stitches, adjustable tension, and free-arm sewing, enhancing your sewing experience with versatility and precision for complex projects.
- Built-in stitches for diverse fabric types.
- Adjustable tension for perfect stitch consistency.
- Free-arm option for sewing hard-to-reach areas.
6.1 Using the Built-In Stitches and Patterns
The Brother JX2517 comes with a variety of built-in stitches and patterns, designed to cater to different fabric types and sewing projects. These include straight stitches, zigzag stitches, stretch stitches, and decorative patterns. To use these, simply select the desired stitch using the stitch selector dial or digital controls, depending on your machine’s model. The machine also features customizable stitch length and width, allowing you to tailor the stitches to your specific needs. For intricate designs, the built-in patterns can be combined to create unique and professional-looking results. Always refer to the stitch chart provided in the manual for guidance on selecting the right stitch for your fabric. By exploring these features, you can enhance your sewing projects with precision and creativity.
6.2 Adjusting Tension for Perfect Stitches
Proper tension adjustment is crucial for achieving perfect stitches on the Brother JX2517. Incorrect tension can lead to loose or tight stitching, potentially ruining your fabric. To adjust the upper thread tension, locate the tension dial on the machine and turn it clockwise or counterclockwise to tighten or loosen the thread. For the bobbin tension, gently pull the bobbin thread to ensure it feels neither too tight nor too slack. The manual provides a tension guide to help you achieve the ideal balance. Always test your stitches on scrap fabric before starting your project to ensure the tension is set correctly for your specific fabric type.
- Check the manual for diagrams illustrating tension adjustment points.
- Test stitches on scrap fabric to verify tension settings.
6.3 Utilizing the Free-Arm Sewing Option
The Brother JX2517 offers a free-arm sewing option, ideal for sewing cylindrical or hard-to-reach areas like sleeves, pant legs, and small projects. To use this feature, remove the flatbed attachment and expose the free arm. This allows for better control and visibility when working with curved or delicate fabrics. The free-arm design also enables easier maneuvering of the fabric, ensuring smooth, even stitches. For optimal results, use the included accessories, such as the circular sewing attachment, to enhance your free-arm sewing experience. Adjust the stitch length and width as needed to accommodate the fabric type and project requirements.
- Remove the flatbed attachment to access the free arm.
- Use the circular sewing attachment for precise control over curved seams.
Maintenance and Troubleshooting
Regular maintenance ensures optimal performance of your Brother JX2517. Clean and lubricate the machine as recommended to prevent dust and debris buildup. Troubleshoot common issues like thread jams or uneven stitches by referring to the manual or contacting Brother support for assistance.
7.1 Regular Cleaning and Lubrication Tips
Regular cleaning and lubrication are essential to maintain the Brother JX2517’s performance. Use a soft brush to remove lint and debris from the machine, paying attention to the bobbin area and tension discs. Apply a few drops of sewing machine oil to moving parts, such as the handwheel and hook race, to ensure smooth operation. Avoid over-lubricating, as excess oil can attract dust. Refer to the manual for specific instructions on cleaning and lubrication intervals. These simple steps will keep your machine running efficiently and extend its lifespan. Always use high-quality sewing machine oil for best results.
7.2 Identifying and Resolving Common Issues
Identifying and resolving common issues with your Brother JX2517 ensures uninterrupted sewing sessions. Thread bunching or uneven stitches often result from incorrect tension settings or improper threading. To fix, rethread the machine and adjust tension according to the manual. Jammed bobbins or broken needles can be resolved by cleaning the bobbin area and ensuring the needle is correctly installed. If the machine stops working, check for power issues or debris buildup. Refer to the troubleshooting section for detailed solutions. Regular maintenance and proper usage can prevent many of these issues. Always consult the manual or contact support for persistent problems.
7.3 When to Contact Professional Support
If you encounter issues that cannot be resolved through basic troubleshooting, it may be necessary to contact Brother’s professional support team. This includes scenarios like severe mechanical damage, electrical malfunctions, or complex software glitches. Before reaching out, ensure you’ve reviewed the manual and attempted recommended solutions. Visit Brother’s official website for contact details, FAQs, and downloadable resources. You can also access their customer service hotline or submit an online support request. Professional assistance is crucial for maintaining your machine’s warranty and ensuring repairs are done correctly. Don’t hesitate to seek help when faced with critical or unfamiliar problems.
- Contact support for severe mechanical or electrical issues.
- Utilize official resources for guidance and repairs.
- Ensure warranty validity by using authorized services.
This concludes the Brother JX2517 Sewing Machine Manual. For further assistance, visit Brother’s official website for FAQs, downloadable manuals, and customer support options.
- Access official Brother resources for extended guidance.
- Explore FAQs and troubleshooting on their website.
- Stay updated with the latest support materials.
8.1 Summary of Key Takeaways
The Brother JX2517 Sewing Machine Manual provides a comprehensive guide to mastering your machine, from initial setup to advanced sewing techniques. Key takeaways include understanding machine components, proper threading methods, and maintenance tips to ensure longevity. The manual also covers selecting the right stitches for fabrics, adjusting settings for optimal results, and troubleshooting common issues. By following the instructions, users can enhance their sewing experience and achieve professional-quality projects. This guide serves as an essential resource for both beginners and experienced sewers, offering clear instructions and practical advice to maximize the machine’s capabilities.
8.2 Accessing Additional Manuals and Guides
To further enhance your understanding of the Brother JX2517, additional manuals and guides are available online. Visit the official Brother website or authorized retailers for PDF versions of the instruction manual, quick reference guides, and troubleshooting documents. These resources provide detailed diagrams, step-by-step instructions, and tips for maintaining your machine. You can also find user manuals specific to the JX2517 model, ensuring you have all the information needed for optimal performance. Utilize these resources to explore advanced features, resolve common issues, and stay updated with the latest support from Brother.
- Download PDF manuals directly from Brother’s official website.
- Explore quick reference guides for easy troubleshooting.
- Access additional support materials for enhanced functionality.
8.3 Staying Updated with Brother Support
To ensure you always have the latest information and support for your Brother JX2517, stay connected with Brother’s official resources. Visit the Brother website for updates, FAQs, and downloadable manuals. Register your product to receive notifications about new features, software updates, and maintenance tips. Additionally, explore Brother’s community forums and social media channels for tips, tutorials, and troubleshooting advice from experts and fellow users. Regularly checking these resources will help you maximize your sewing experience and keep your machine performing at its best.
- Visit Brother’s official website for the latest updates and guides.
- Register your machine to receive important notifications.
- Engage with Brother’s community for tips and support.